Easy Fixes For Keurig Not Pumping Water
Brewing coffee with a Keurig machine is every coffee enthusiast’s dream. First thing in the morning, having a cup of coffee is effortless and quick with a Keurig.
Keurig coffee is as easy as popping in your favorite K-cup, filling the machine’s water reservoir, and pressing the brew button. There you have it, a cup of great-tasting coffee in a minute.
However, what if your favorite coffee machine breaks down unexpectedly? Yes, it is possible, but it happens rarely.
One of the most common problems Keurig users face is their coffee machine not pumping water. Whenever a blockage occurs in the brewer’s water flow, it disrupts the whole brewing process.
Despite this being a problem that you can fix, the first step to resolving it is to determine the reason behind it.
There can be multiple reasons, and in this article, we will cover the most so that you can fix your Keurig and enjoy your coffee. So keep reading!
How Do You Detect that Your Keurig is not Pumping water?
A Keurig coffee maker will try to communicate its malfunction to you through error signals and disrupted actions.
If it is not pumping water, you can detect it when the following problems show up in the coffee machine:
- Keurig brewer is not brewing a full coffee cup.
- The Keurig coffee machine is stuck in preheating mode.
- The coffee machine shows an ‘add water’ message.
- Keurig coffee doesn’t taste pleasant or contains coffee residue.
- The brewer takes too long to brew coffee.
- The coffee maker spits water back into the reservoir during the brewing process.
What are the Reasons Behind Keurig not Pumping water, and how to Resolve them?
You have gone through the list of issues you can encounter with your Keurig, but why do those problems occur in the first place, and how can they be resolved?
The following points are about the most common reasons behind Keurig not pumping water, with easy possible solutions to fix them.
1. The Water Tubing has Limescale and Calcium Build-up
The water tubes and pipes inside your coffee machine are prone to gunk and debris because of the water you use to brew coffee.
The water, especially tap water, contains calcium and magnesium minerals that accumulate in the brewer. Over time, these minerals turn into dried-up gunk and chalky substances.
The blockage disrupts the water flow. Hence Keurig stops pumping water.
Solution: Descale Your Keurig Machine
Descaling is the process of removing the dried-up gunk or coffee residue from the machine’s internal parts.
You will need the following:
- A Keurig descaling solution
- Water
- A Cup
Method:
- Prepare the descaling solution and add it to the water tank (follow the instructions on the pack).
- Turn on the coffee brewer.
- Remove the coffee pod if there is one.
- Place a mug on the drip tray to collect gunk.
- Activate the descaling mode by pressing the 8 and 12-oz buttons simultaneously for 3 seconds (it may not work for all models, so refer to your Keurig’s user manual).
- Once the descaling lights start flashing, press the brew button.
- The descaling process will start.
- Till the machine runs out of water, keep repeating the process by pressing the brew button.
- Once the water reservoir runs out of water, fill it with fresh water and repeat the process.
- Repeat the cleansing cycles until the descaling solution completely washes out.
- Exit the descaling mode using the same steps you used to activate it.
- Let the machine sit for 30 minutes.
- Your brewer is clean and ready to use!
2. The Coffee Brewer is Clogged with Sediment
Over time Keurig coffee makers accumulate sediments, coffee residue, and mineral deposits which dry up and clog the brewer if it is not descaled regularly.
A clogged Keurig will disturb the water flow and the overall working mechanism, leading to it not pumping water.
Solution: Descale your Keurig with Vinegar
Keurig recommends descaling its coffee machine every 3 to 6 months or after brewing 600 k-cups.
You can either use a descaling solution or vinegar for this process.
Vinegar has acidic properties that help in dissolving the dried-up gunk.
- Fill the water reservoir with equal parts vinegar and water.
- Remove the K-cup from the brewer.
- Put an empty cup under the coffee spout.
- Then repeat the brew cycle until the vinegar level reaches the minimum level.
- Turn off the auto shut-off.
- Let the vinegar sit in the machine for at least 45 minutes to dissolve the sediment.
- After that, discard the vinegar from the water reservoir.
- Rinse the tank and fill it with fresh water.
- Perform several cleaning cycles to ensure no lingering vinegar taste or smell.
To use white vinegar for descaling, mix it with equal parts water. The high content of vinegar can damage the machine permanently.
3. Parts of Keurig Coffee Machine Not Aligned Properly
The Keurig brewer’s water tank has a magnetic component. This magnet detects the level of water in the reservoir. This magnet must be properly aligned with the machine to detect water for brewing pumping.
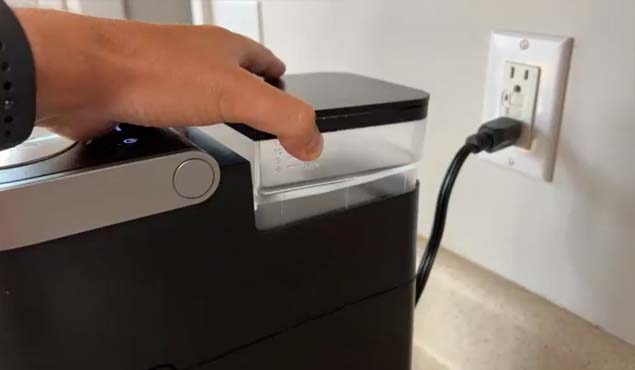
It may be due to vibrations of the machine or when attaching the water reservoir to the brewer.
Solution: Align the Water Reservoir
Ensure that the magnet connecting the water reservoir to the coffee machine is aligned properly. You can gently give it a few taps near the magnet housing or shake the water reservoir.
If tapping or readjusting the water tank doesn’t work, your water tank requires cleaning.
Rinse the tank under running water; use dish soap and a non-abrasive cloth to clean the tank thoroughly for better results.
4. There is Not Enough Water in the Water Reservoir
The water reservoir of your Keurig requires an adequate amount of water for a successful brewing process. The machine will show an ‘add water’ error when the tank has less water.
If the water level is too low for the machine to detect, it will not pump water, and the brewing process will not start. Remember that the machine will require more water for brewing a larger cup.
Solution: Fill Water to the Maximum Line
If your Keurig is not pumpkin water because there is not enough water in the reservoir, fill it more than halfway or till the full line. Once you fill the water tank, the coffee machine will no longer show the ‘add water sign.
If it still does, you need to pour more water.
5. The Puncturing Needles of the K-cup Holder are Blogged
The pod holder of a Keurig consists of entrance and exit needles present at the top and bottom.
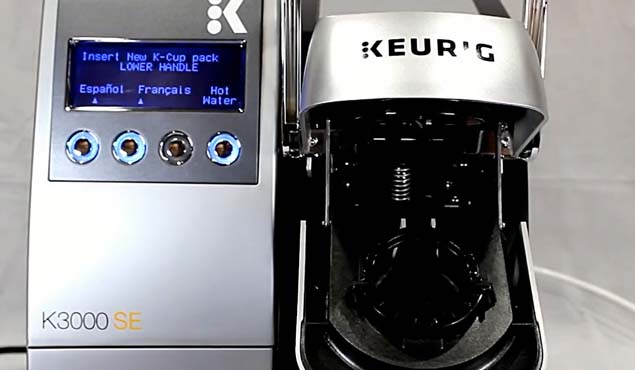
These needles are for piercing the coffee pod to extract coffee from the coffee beans. The pod holder gets dirty when you use your Keurig without descaling it for a prolonged time.
These puncturing needles in the pod holder accumulate coffee residue, dry up and clog, disrupting the coffee flow.
Solution: Clean the Needles
There is a slight difference in cleaning the exit and entrance needles, but it’s nothing complicated.
Follow these steps to clean the entrance needle:
- Turn off and unplug the machine.
- Open the machine head and remove the pod.
- You will see the entrance needle at the top. It will have three holes.
- Straighten the paper clip and insert it into the needle.
- Move it around to loosen it up and remove the residue.
Follow these steps to clean the exit needle:
- Open the lever.
- Gently lift the pod holder from below to remove it from the machine.
- Press the pod holder from both sides to remove its funnel.
- Once you detach the funnel, you will see a narrow tube.
- Straighten a paper clip and insert it into the needle.
- Wiggle it gently to remove the dried-up gunk and coffee grounds.
- Wash the pod holder under running water and assemble it back in the machine once it dries up.
Keurig Still Doesn’t Pump Water After Resolving the Issue: What to do?
If you have tried and tested every possible solution to counter the issue with your Keurig, but it is still not pumping water, there can be different reasons behind it.
1. Air Bubbles in the Water Tubing
Water flow can be obstructed by air bubbles trapped inside the pipes that draw water from the water tank. The presence of air bubbles can force the machine to spit the water back into the reservoir rather than pump it out.
Clearing the air bubbles from the water tubing can restore the normal water flow.
Solution: Shake the Brewer to Remove Air Bubbles
To remove air bubbles from the machine, follow these steps:
- Turn off the brewer and remove it from the outlet.
- Disassemble the coffee machine by taking out all its removable parts; the water reservoir, the drip tray, and the cup holder.
- Take your brewer near a sink and turn the coffee maker upside down.
- Shake the brewer gently and give it a few spanks to clear the airlock.
- Reassemble the machine, and it will be ready to use.
Before performing this task, unplug the brewer and let it sit for at least an hour to cool down.
2. Your Keurig Requires Technical Support
If no fixes work for your Keurig, it has probably a technical issue. It may have a damaged water pump, heating chamber, or any other technical difficulty that needs professional assistance.
Solution: Contact Keurig Customer Service
You must contact Keurig customer service if you cannot fix your coffee maker with any of the above solutions.
Al Keurig brewers have a one-year warranty. If your warranty is valid, the brand will repair your brewer free of cost. If any part of the brewer requires replacement, it will also be done for free.
FAQs
How do you reset a Keurig after descaling?
To reset Kerugi after descaling, press the 8oz and 12 oz buttons simultaneously. It will reset the Keurig and make it ready to brew.
How do you unclog Keurig water lines?
To unclog a Keurig waterline, descale it. Descaling will unclog the water tubing and keep the water flow normally. Or you run several cleansing cycles without a coffee pod to clean the machine.
How do you tell if your Keurig is clogged?
When a Keurig is clogged, it will give you warning signs. Your Keurig can become louder while brewing coffee, the coffee can start tasting bitter, or the machine can stop pumping water altogether.
How long does a Keurig pump last?
The average lifespan of a Keurig pump is five years, but its lifetime can only be affected if you descale or clean your machine regularly. So descale your machine every 3 to 6 months to avoid any malfunction.
How long do Keurigs last?
A Keurig’s lifespan is 3 to 5 years. It can only last a long time if you pay attention to its maintenance. Proper cleaning and usage can increase the longevity of your Keurig coffee maker.
Is it OK to use vinegar in a Keurig?
You can descale your brewer with vinegar on condition that you use the right proportions. Using more vinegar and less water can damage the machine’s internal parts because of its acidic nature.
What buttons do I press to descale my Keurig?
To activate the descaling mode, you must press the 8 oz and 12 oz buttons together for three seconds. However, it may differ for some Keurig models, so refer to your Keurig user manual.